


Machine learning couldn’t be hotter, with several heavy hitters offering platforms aimed at seasoned data scientists and newcomers interested in working with neural networks. Among the more popular options is TensorFlow, a machine learning library that Google open-sourced in November 2015.
In my January 2018 review of TensorFlow r1.5, I discussed how the library has become more mature, implemented more algorithms and deployment options, and become easier to program over the preceding year. The best deep learning library had become even better.
In this article, I’ll give you a very quick gloss on machine learning, introduce you to the basics of TensorFlow, walk you through a few TensorFlow models in the area of image classification, and show you the new high-level APIs. Then I’ll point you to additional resources for learning and using TensorFlow.
TensorFlow prerequisites
You need a few prerequisites to fully understand the material I’ll cover. First, you should be able to read Python code. If you don’t know how, the book Learning Python by Mark Lutz is excellent; for a quicker, free introduction on the web, try Python for Beginners or Learn Python.
Second, you should know something about calculus and basic statistics. Most programmers learn these in college or even high school, but if you’re rusty on any of the concepts I’ll be using, there are plenty of resources on the web, such as Calculus for Beginners and Usable Stats.
It would also help if you understood gradient-based optimization methods. If you don’t, you can treat the optimizers we’ll be using as black boxes.
Machine learning, neural networks, and deep learning
In traditional programming we explicitly tell the computer what to do with its input data ahead of time, including various program branches that respond to conditions in the data. In machine learning, on the other hand, we give the computer some data, a model for the data, weights and biases for the terms of the model, a function to define the “loss” or “cost” of a model, and an optimization algorithm to “train” the model by adjusting the weights and biases to find the minimum loss.
Once the computer finds the best model from training on the initial data, we can use that model to predict values for new data. If the data tends to change over time, we may have to retrain the model periodically to keep it accurate.
We typically divide the initial data into two or three groups: training data, test data, and, optionally, validation data. The data may be continuous (real numbers), in which case we will be solving a regression problem to predict a response, or it may be discrete (integers or class labels), in which case we will be solving a classification problem.
An artificial neural network, one of the many ways to implement machine learning, is a model consisting of an interconnected group of nodes, typically with an input layer, an output layer, and one or more hidden layers in between. These days each node is often a “sigmoid” neuron, meaning that its activation function varies smoothly between 0 and 1 in an “S”-shaped curve, which gives more stable behavior than the binary step function of the older “perceptron.”
 By Glosser.ca - Own work, Derivative of File:Artificial neural network.svg via Wikipedia
An artificial neural network typically has an input layer, an output layer, and one or more hidden layers in between.
Deep learning is, at its core, a neural network with multiple hidden layers—that is, a deep neural network. There are many types of deep networks; one of the most commonly used is the deep convolutional network, which works well for image recognition. As you explore TensorFlow you will read about this and other kinds of deep neural networks, such as recurrent neural networks (RNNs), which are handy for speech recognition. There are many ways to minimize the loss in deep neural networks, and we’ll discuss several of them as we try some examples.
You can learn much more about neural networks and deep learning at an introductory level from a free e-book on the subject by Michael Nielsen. Deep Learning by Ian Goodfellow, Yoshua Bengio, and Aaron Courville offers an even more technical overview.
TensorFlow Playground
To get a feel for neural networks, try the TensorFlow Playground.
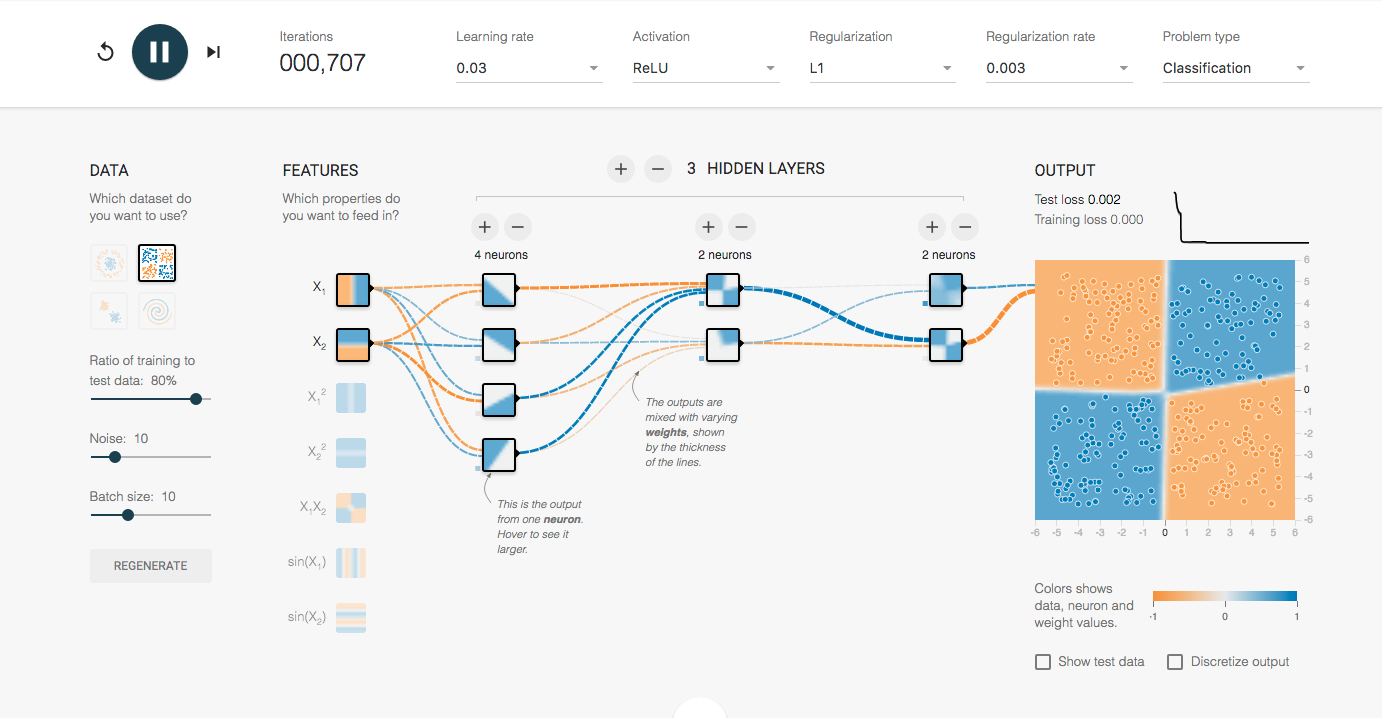
The TensorFlow Playground helps you get a feel for working with neural networks.
The playground allows you to try to solve four classification problems and one regression problem employing your own choices of feature selections (the properties used to create your predictive model), neuron activation functions (to define the output of your nodes), and the number of hidden layers and number of neurons in each layer (for defining how deep your network should be). You can also adjust the batch size for each iteration of training data, ratio of training to test data, the learning rate for training your model, type of regularization, and regularization rate. Try various strategies and see how low you can get the loss for each problem and how long each one takes to converge. As you play with methodologies, pay attention to the way your intuition begins to develop.
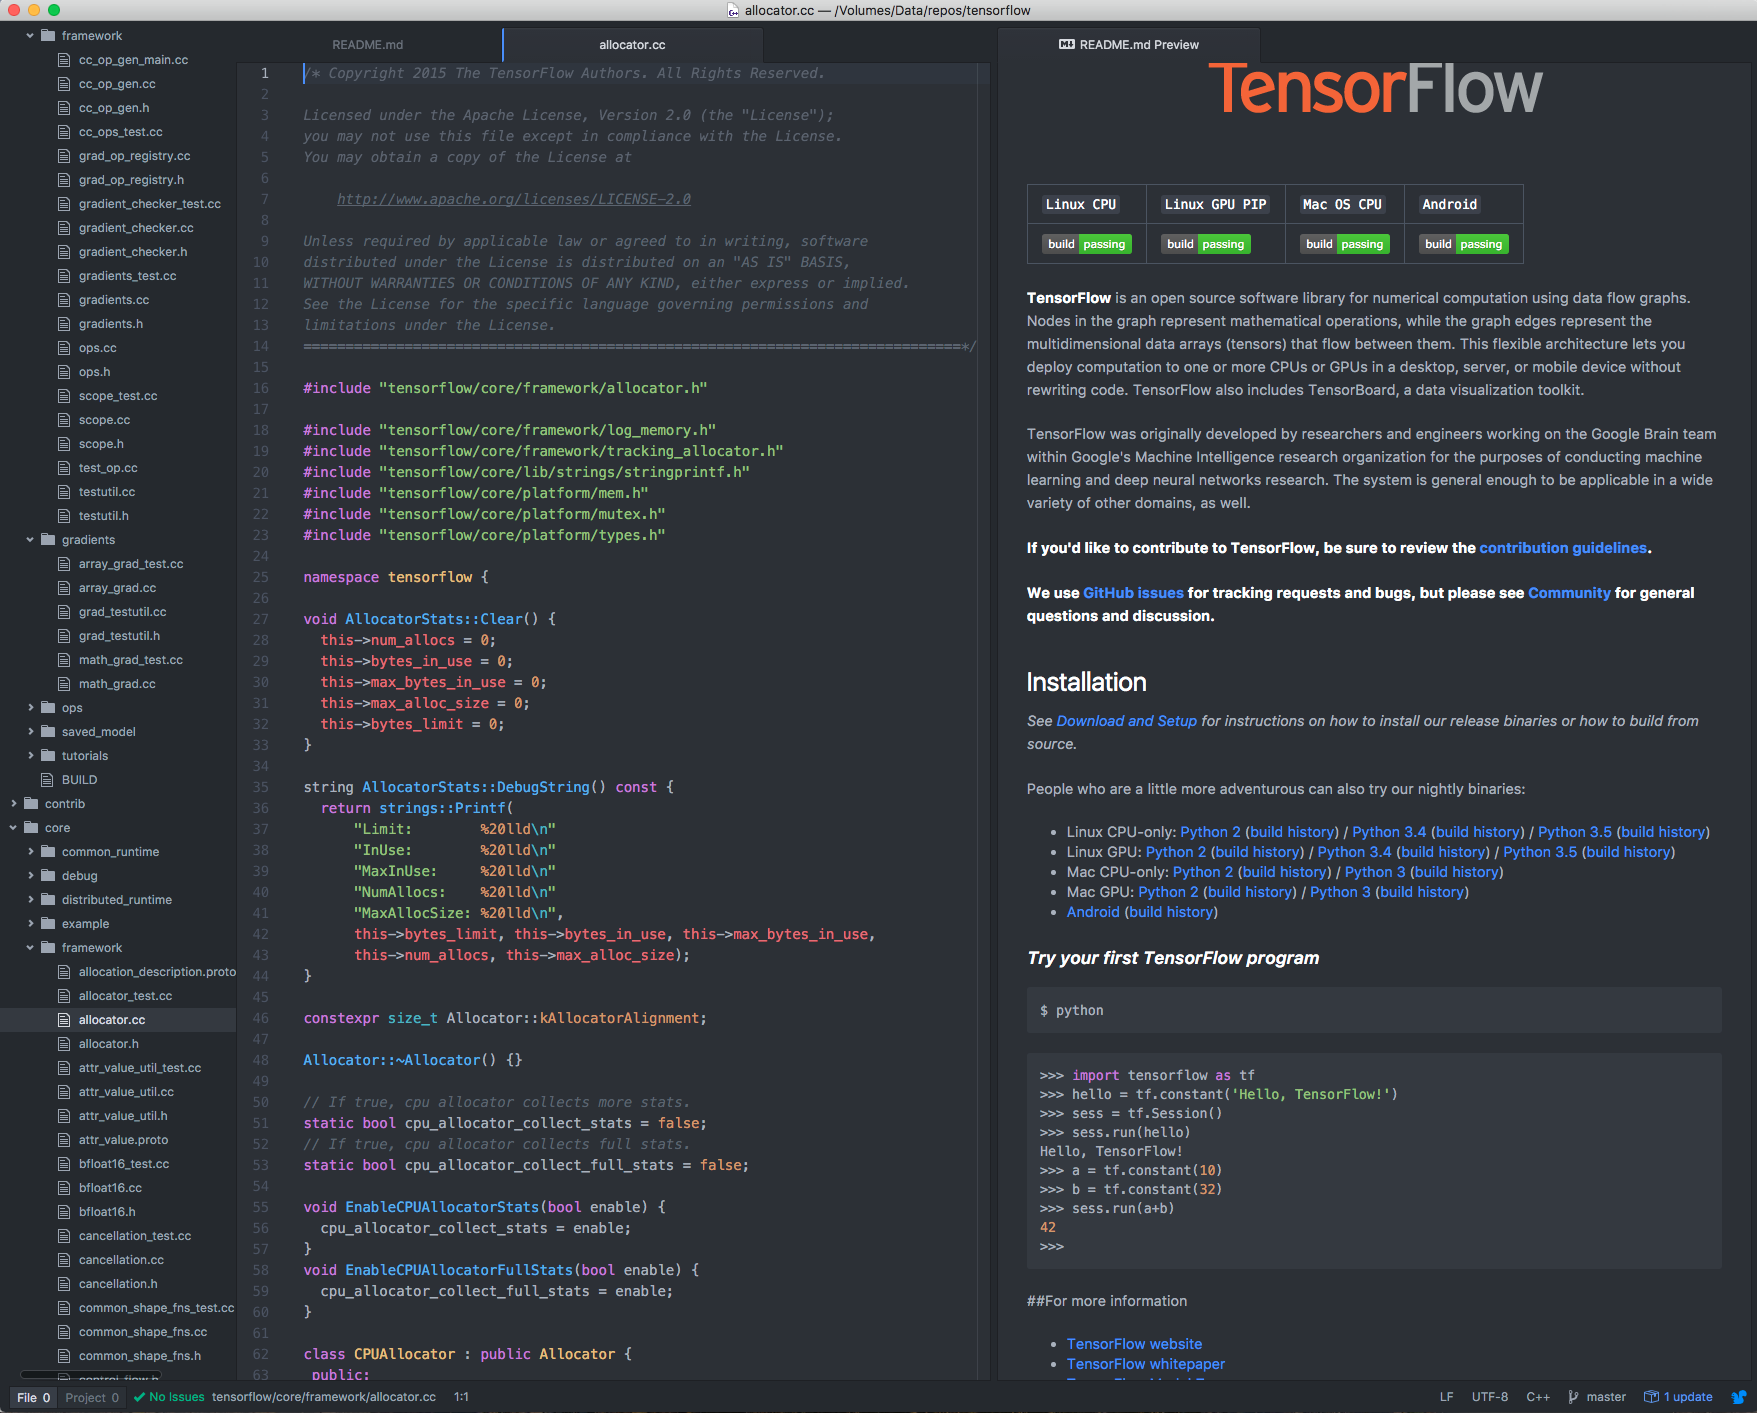
Once you think you’re getting a feel for neural networks from the Playground (which is not actually based on TensorFlow even though it lives in the TensorFlow repository), it’s time to check out the TensorFlow source code from GitHub.

TensorFlow can be checked out from the TensorFlow GitHub repository.
The README.md file at the bottom of this GitHub page has a good overview and useful links.
I like to clone repos with GitHub Desktop, but any Git client will work, as will any of the other methods suggested on the GitHub page:

Clone the TensorFlow repo to get started with TensorFlow on your own machine.
TensorFlow data flow graphs
TensorFlow supports machine learning, neural networks, and deep learning in the larger context of data flow graphs. These graphs describe the computational network for models in a more complicated but more flexible, generalized, and efficient way than the Playground. The code for a TensorFlow solution first loads the data and builds the graph, then establishes a session and runs the training of the model against the data. (The new, experimental eager execution feature dispenses with the extra step of explicitly creating and running a session.)
As you’ll see when you open your TensorFlow repository in a programming editor or browse the code on GitHub, the core of TensorFlow is implemented in C++ with optional GPU support. It uses a domain-specific compiler for linear algebra (XLA) to JIT-compile subgraphs of TensorFlow computations (data flow graphs). A version of XLA that supports Google Tensor Processing Units (TPUs), which is not open-sourced at this time, uses custom code generation; the open source CPU and GPU back ends currently use LLVM.
Higher layers of TensorFlow and the primary TensorFlow API are implemented in Python. In addition to Python, there are APIs in C++, Java, and Go.
The TensorFlow README.md file offers a solid overview and useful links.
As you browse through the TensorFlow repository, pay special attention to the examples directory. We’ll be coming back to the examples to understand specific TensorFlow applications.
Installing TensorFlow
You can install TensorFlow locally or use the cloud. Perhaps the most powerful way you can use TensorFlow is to set up a Google Cloud Platform project, then set up an environment for Cloud Machine Learning, Google’s large-scale training service, either in a Cloud Shell, in a Docker container, or locally.
For the purposes of getting started, however, I think you should install TensorFlow locally first. The TensorFlow team recommends doing a Python virtualenv installation when it's available, but there are other options, depending on your system. When using the Docker image to train models, you should allocate most of your computer’s RAM and cores to Docker, then close Docker to release the resources when you’re done.
During installation, you may have a choice of CPU-only or GPU versions. The GPU version will run trainings much faster on machines with an Nvidia chip, but it’s much harder to install correctly. I’d suggest installing a CPU-only binary at first.
In addition to binaries for numbered release versions, the TensorFlow team now supplies nightly master-branch Python wheel binaries for Linux, Mac, and Windows. The nightly Mac CPU wheel installed easily for me using the command:
$ sudo pip install tf-nightly
Installing a nightly build gives you the latest code that builds correctly and passes all acceptance tests. The website documentation is usually for an earlier stable build, but the latest documentation and the documentation for other numbered versions are available in the code repository.
You may run into a permission error uninstalling old versions on the pip installation step of the standard “native” pip build:
$ sudo pip install —upgrade $TF_BINARY_URL
If that happens to you, add the switch to ignore the installed versions:
$ sudo pip install –upgrade —ignore-installed $TF_BINARY_URL
Your next step is to validate your installation. I recommend copying the Python code for this line-by-line from the website or repository. If there is going to be a problem, it most likely will happen while Python attempts to import TensorFlow:
>>> import tensorflow as tf
When you’re through with the Python session, exit() will get you back to the shell.
If you want to fully test your installation, run the convolutional.py demo from the TensorFlow repository. On a CPU, this demo will spend about half an hour training a moderately simple convolutional neural network model for identifying handwritten digits from the standard MNIST data set:
$ python -m tensorflow.models.image.mnist.convolutional
While that’s grinding away and making your computer fan spin, you might want to read more about what’s going on. Let’s start with data flow graphs, which underpin TensorFlow’s architecture.
Understand data flow graphs
A data flow graph is a kind of directed graph describing a mathematical computation. If you’re not familiar with directed graphs, all you really need to know is that they are graphs with nodes and edges, and the edges flow in one direction (are directed) from node to node.
In a data flow graph, the nodes represent mathematical operations, or endpoints to feed in data, push out results, or read/write persistent variables. The edges represent the input/output relationships between nodes and carry dynamically sized multidimensional data arrays, which are also known as tensors.
In TensorFlow (named for the flow of tensors along the edges) you can assign each node to a computational device, and the nodes execute asynchronously and in parallel once all the tensors on their incoming edges become available. As I mentioned earlier, a TensorFlow model loads the data, creates the data flow graph, establishes a session, and runs the training within the session. The session invokes a just-in-time compiler (XLA) to generate code from the data flow graph.
As you can see in this data flow graph in the TensorFlow programmer’s guide, the neural weights W and offsets b appear in multiple places: in the rectified linear unit (ReLu) and log of probability (Logit) neuron layers as inputs, and in the stochastic gradient descent (SGD) training layer as outputs. That’s cyclic, so the network needs to be solved iteratively. The Softmax and Cross entropy nodes calculate the loss, and the Gradients node automatically calculates the partial derivatives of the loss with respect to the weights and offsets, to feed into the SGD trainer.
To make this clearer, let’s look at a concrete example in Python.
Understand how to use TensorFlow
The tutorial that the TensorFlow authors offer for beginners goes step-by-step through some simple TensorFlow models. Among other things it teaches you about the high-level tf.estimator API for building model layers.
“A Guide to TF Layers: Building a Convolutional Neural Network” is a slow-paced introduction to a very simple Softmax Regression classifier for the MNIST handwritten-digit data set. It’s a different—and worse—way of classifying digits than the convolutional model that we ran earlier to validate your TensorFlow installation. It’s a bit easier to understand, however.
I’d suggest that you read my explanation, then run the model yourself while reading the official tutorial. The Python program we’re discussing is at tensorflow/examples/tutorials/mnist/mnist_softmax.py in your TensorFlow repository.
You can safely skip over the first few imports, which are basically housekeeping. The data-reading code import comes next:

This actually pulls in several other program files, which will download the official MNIST training, test, and validation image data when we call it. The tutorial explains the data in detail.
The next code imports the tensorflow library module, gives it the name tf, and clears all flags. You always need to import tensorflow before you can use it.

Now we come to the executable code. First, we read in the data using the code we imported on line 28:

This will take a few seconds, then output: